Kraftin' Kimmie Stamps is thrilled to be featured with a full page in the WINTER Issue of Canadian Scrapbooker Magazine!
Here is a sample of our page!!
In order to celebrate, Kraftin' Kimmie Stamps would like to GIVEAWAY TEN SETS OF THE 4 STAMPS that were used to create the amazing fall themed cards by our talented Krafty Girls!!! The winners will receive: DIANA, TOYMAKER ELF, BALANCING ELF and the O HOLY NIGHT SHEPHERD!
All you have to do to be entered to win, is leave a comment ON THIS POST telling us what your favourite KKStamps stamp is from our new website!! It's that simple!! You have until December 18th at midnight EST to enter! Winners will be announced on December 19th!
And as a special treat, we have the simple
instructions to create each of these holiday beauties!!! So now you can
make them too!!! Check them out:
1.
Make card base 6x6 from kraft
cardstock
2.
cut mat from green American
Craft cardstock 5 ¾ X 5 ¾
3.
cut Red BoBunny Wild Berry Red
Dot cardstock 5 ½ X 5 ½, use reverse distressed side
4.
Cut BoBunny Noel Memories
Patterned paper 5 X 5
5.
Cut BoBunny Noel Traditions
patterned paper 5 X 4
6.
Cut BoBunny Noel Traditions 3 X
5, use reverse side of paper and place vertically
7.
Cut BoBunny Noel Stripes 2 X 6
and Noel Joy patterned paper 3 X 6, layer
8.
Add Velvet American Crafts
ribbon
9.
Stamp Diana stamp image and
colour with Copics
10.
Cut image out with Circle
Spellbinders Nestibilites Die
11.
Leave image in Die and ink with
Antique Linen Distress Ink
12.
Cut Scalloped mat with
Scalloped Circle Spellbinders Nestibilities Die
13.
Cut Christmas Ornament Shape On
Silhouette Digital Craft Cutter
14.
Pierce small hole in top of
ornament shape Add BasicGrey Epoxy Glazed Brad to Ornament Shape
15.
Adhere image to scalloped mat
and then to ornament die cut shape
16.
Add flowers with BasicGrey
Brads
17.
Stamp sentiment, cut out with
Spellbinders tag and leave sentiment in die and ink with Antique Linen Distress
ink.
18.
Add clear gems here and there.
19.
Add Skaura Stardust pen to
image and spread around with finger to add a soft sparkle to image
Copics Used:
Skin: E000, 00, 21, 11 R20
Hair: E42, 44, 49
Pants E35, bow and blanket R27, 29 and top G94
1.
Form 5 1/4” x 5 1/4”
top-folding card from red cardstock; set aside.
2.
Adhere green border sticker to
bottom of a 5” x 5” block of word patterned paper.
3.
Insert a bell brad into each
scallop on border, bending brad backs toward inside of paper block.
4.
Adhere a 5” x 1 ¾” block of
green/white patterned paper above green sticker strip. Adhere thin strip of red cardstock along top
edge of green/white paper.
5.
Stamp elf onto 3” x 4” block of
white cardstock. Color with
markers. Add ground using pencils. Mat onto red cardstock.
6.
Using a kraft knife, cut a ¾”
slit in upper right corner.
7.
Feed ribbon through slit (from
back to front). Adhere stamped image
over patterned blocks, wrap ribbon around back and tie on right front side.
8.
Place foam boosters on back
side of ornament sticker. Thread string
through hanger hole. Adhere ornament and
tuck string behind bow. (Poke hole
beneath knot of bow and draw strings to back of patterned block. Secure ends with tape.)
9.
Stamp “joy” onto white
cardstock. Punch using ¾” circle
punch. Adhere over ornament center using
foam booster.
10.
Adhere completed block to card
front.
Copics Used:
E50, E51, R20, B02, E15, E18, R81, R83, R85, Y15, Y17, Y19, G03, G05, G07, R22, R24, R27, B0000
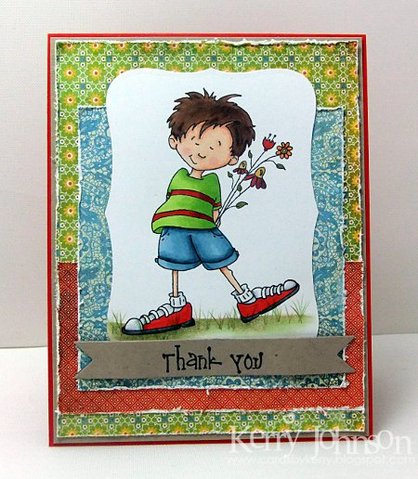
1. Create a 6"x6" card base. (I cut all my layers at 1/8" increments)
2. Cut out all patterned paper layers and cardstock mats, adhere together and add stitching if desired.
4. Before adhering the horizontal panels, attach a flat length of ribbon.
3. Adhere layers together and attach to card base.
4. Stamp image on paper of choice (I used Neenah) with Memento Ink and colour with Copic markers. (See colour list )
5. Mask image and sponge in background while the paper is still in your
die by applying Walnut Stain Distress Ink. (I used make up sponges.)
6. Create a decorative frame for your image by cutting long strips of
cardstock with a border punch. (I used a Martha Stewart punch.) You may
need to cut several strips depending on the size of your oval. Snip your
border with little "V" shaped notches and attach it around the
perimeter of your image panel using a strong double sided tape. (I used
Scor Tape) The little notches should allow you to manipulate your paper
to fit around the curves of the oval. Some border punches may work
better than others, so feel free to experiment! :)
7. Stamp or print out a sentiment (mine was computer generated) and cut
it out with circle Spellbinders. Use Spellbinders Lacey Circles for
matting.
8. Add a bow to your sentiment. I used a Bow Easy to tie mine.
9. Add some decorative pearls if desired.
Copics Used:
Skin E000, E00, E11, R20 Hair: E50, W00, W1, W3, W5 Shirt: R22, R27,
R46, E59, C5, C7 Vest and Shoes: G20, G82, G85, G99, C5, C7 Pants: B91,
B93, B95, B97, B99, C5, C7 Stool: E50, E31, E25, E29, E97, E99 Horse:
E50, E31, E25, E29
O HOLY NIGHT SHEPHERD by Kim Reid
1. Create 6x6 card base, cardstock for matting and patterned papers.
2. Sponge all patterned paper layers using distress ink.
3. Stamp image on Neenah white cardstock using Memento Tuxedo Black ink and colour with Copic markers or desired medium.
4. Cut and emboss image using desired Spellbinder Nestabilities shape.
5. Add lace trim across the middle and fancy brad (I chose a star shaped antique brad.).
6. Stamp sentiment from Nativity Sentiments set on scrap paper and distress.
7. Attach all layers together, using pop dots on main image and sentiment!
Copics Used:
E000, E00, E11, R20, E50, E08, E09, E23, E25, E42, E43, YG91, YG93, YG95